Mutton Karahi

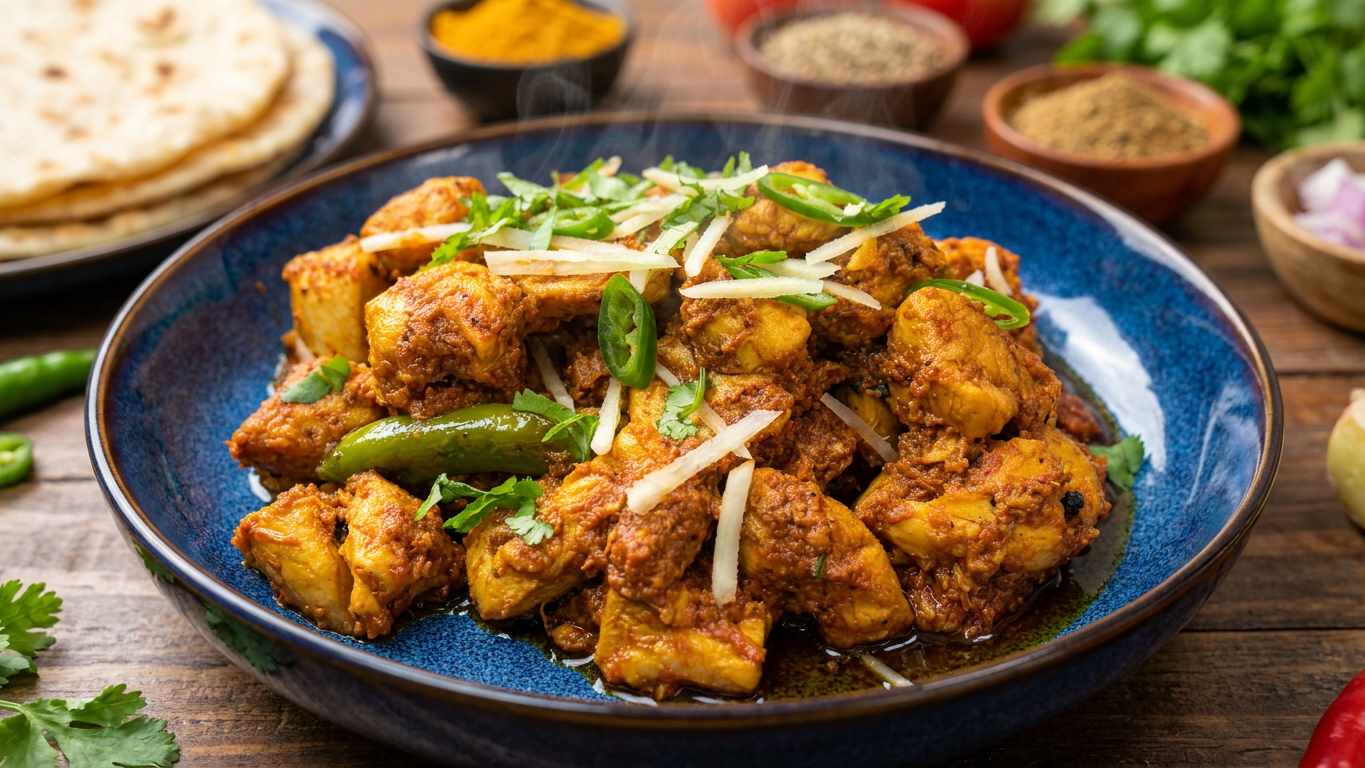
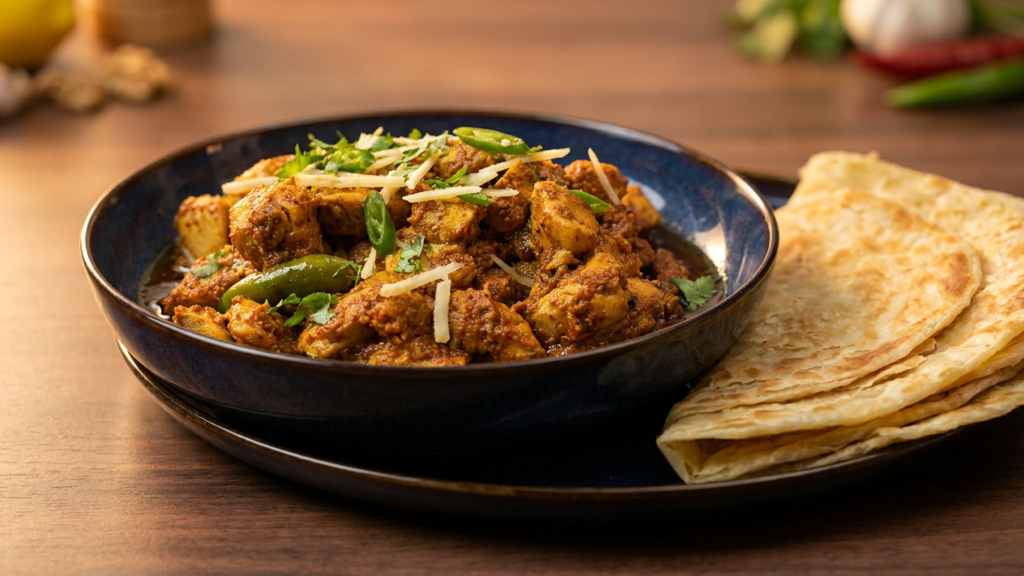
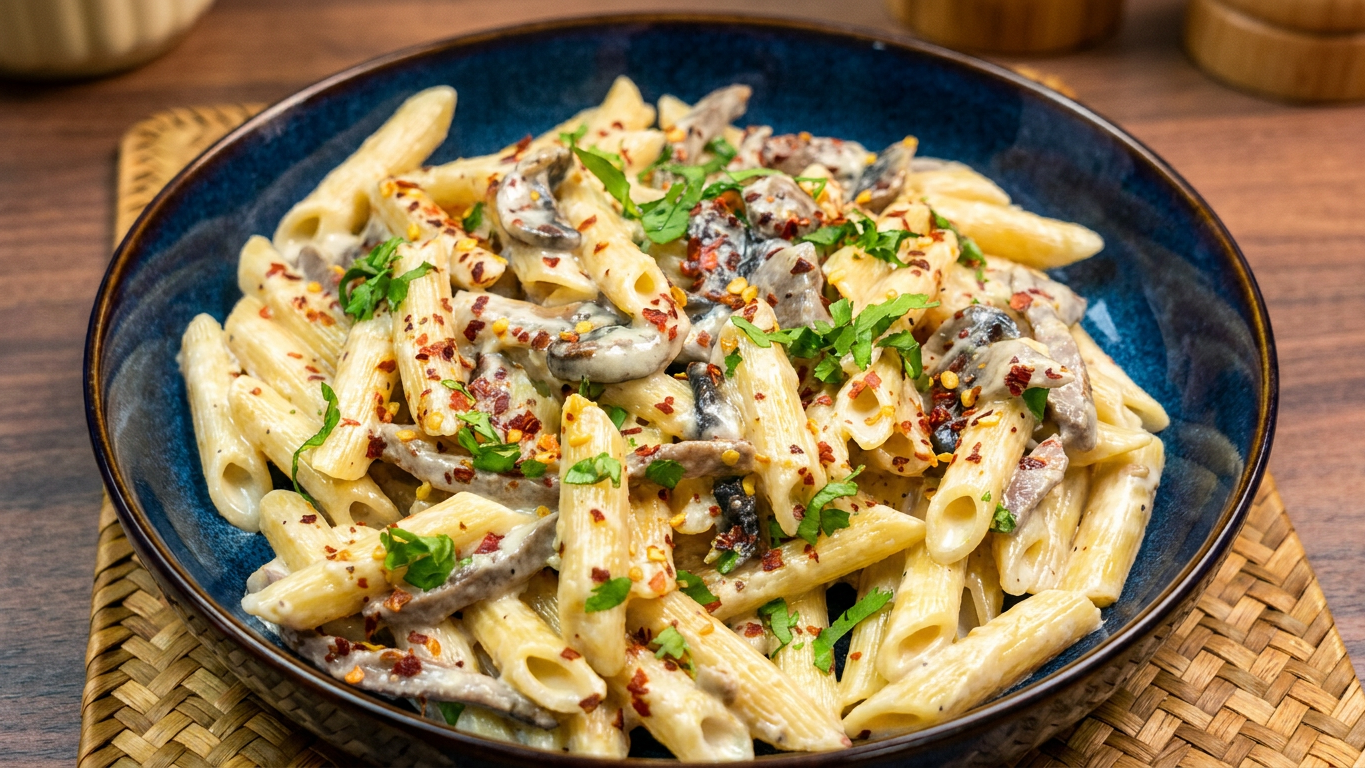
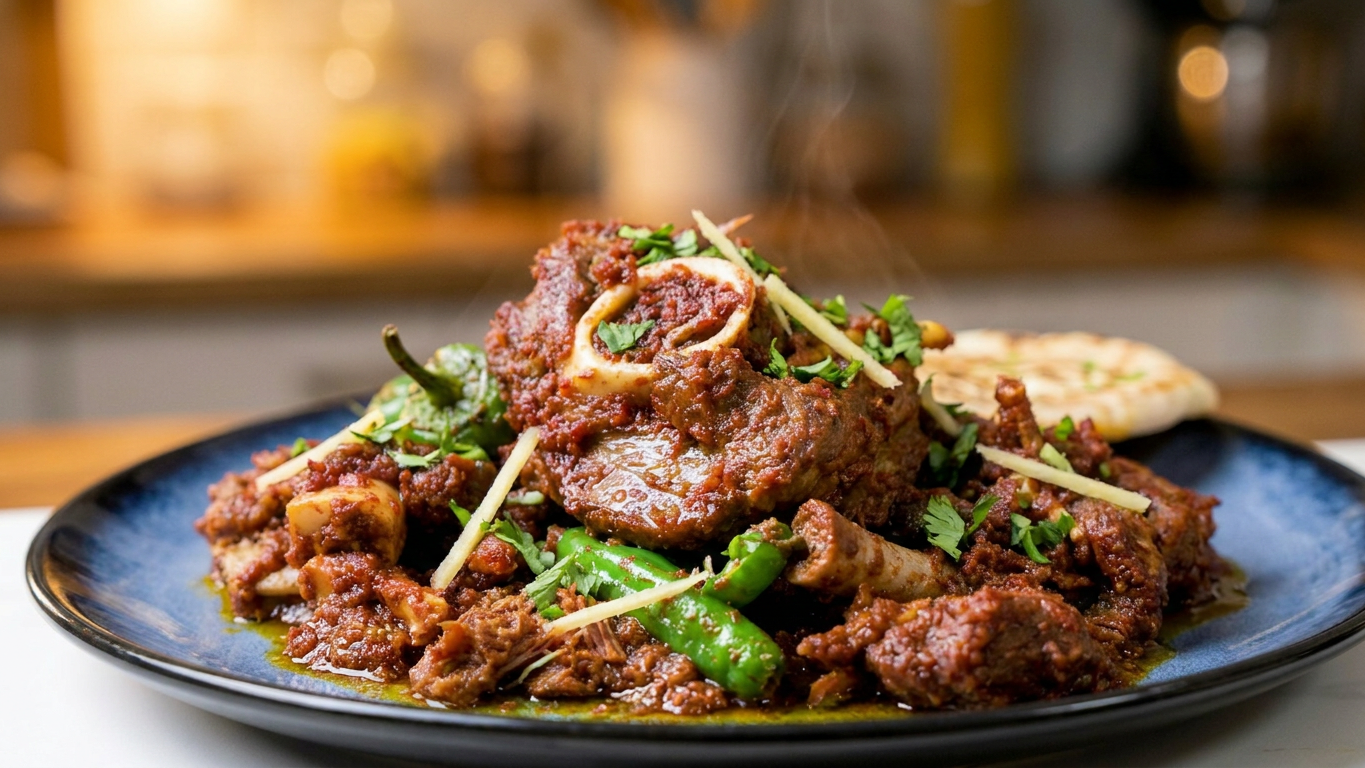
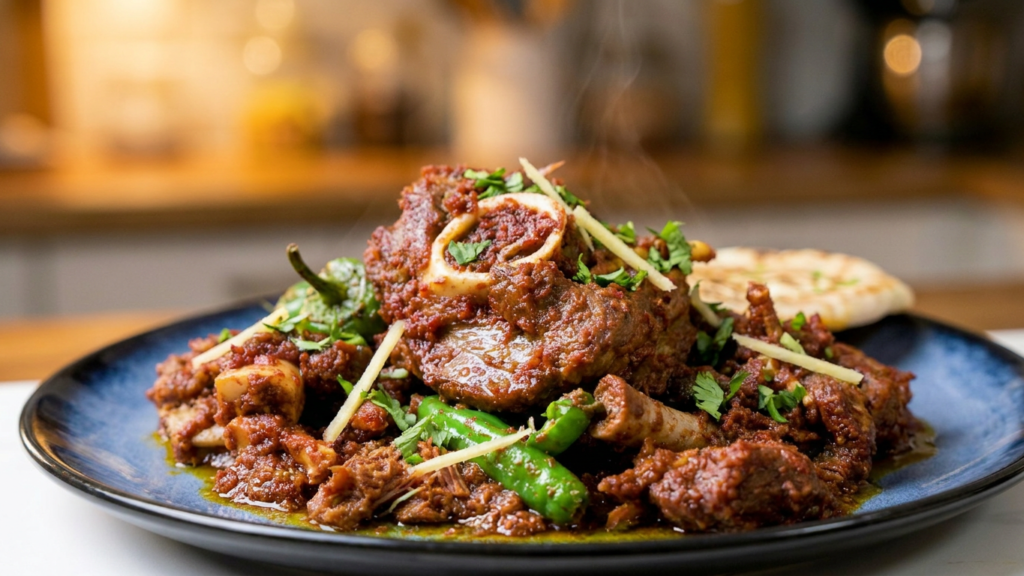
If you’re craving a rich and hearty dish packed with bold flavors, this Mutton Karahi is a recipe you’ll want to make again and again. Tender pressure-cooked mutton is simmered with fresh tomatoes, aromatic spices, and green chilies until the masala becomes thick and fragrant. Finished with fresh ginger and extra chilies, this classic karahi delivers authentic flavors that pair perfectly with warm naan or steamed rice.

Despite its impressive taste, this recipe is surprisingly easy to prepare. Using a pressure cooker helps the mutton become tender in less time, while the freshly roasted spice blend adds incredible depth and aroma. Whether you’re serving it for a family dinner or a special gathering, this spicy and comforting dish is sure to be a crowd-pleaser.

Mutton Karahi

Mutton Karahi is a classic Pakistani dish made with tender pressure-cooked mutton simmered in a rich tomato-based masala and fragrant roasted spices. Fresh green chilies and ginger add a bold, authentic flavor, while high-heat cooking creates the signature thick and flavorful gravy. Perfect for family dinners or special occasions, this hearty dish pairs wonderfully with naan, roti, or steamed rice.
Prep Time 10 minutes
Cook Time 20 minutes
Bhuna time 35 minutes
Total Time 1 hour 5 minutes
Course Dinner, Main Dish
Cuisine Pakistani, South Asian
Servings 6

Equipment

  • Instant Pot and Wok

Ingredients
  

For the Mutton

  • 2 pounds 900 g mutton mix pieces
  • 1 tablespoon ginger garlic paste
  • 1 teaspoon salt
  • 2 cups water

For the Roasted Spice Mix

  • 1 teaspoon coriander seeds
  • 1 teaspoon cumin seeds
  • 12 –13 black peppercorns
  • 2 green cardamom pods
  • 6 dried red chilies

Additional Spices

  • ½ teaspoon red chili powder
  • 1 teaspoon turmeric powder
  • 1 teaspoon salt

For the Karahi

  • 1 cup oil
  • 2 medium onions sliced
  • 1 tablespoon ginger garlic paste
  • 2 tablespoons green chili paste
  • 1 pound 450 g tomatoes
  • Fresh green chilies sliced
  • Ginger julienne for garnish

Instructions
 

Pressure Cook the Mutton

  • Add the mutton, ginger garlic paste, salt, and water to the pressure cooker. Mix well and spread the meat evenly.
  • Close the lid and pressure cook on High for 20 minutes. Allow the pressure to release naturally.

Prepare the Karahi Masala

  • Dry roast coriander seeds, cumin seeds, black peppercorns, green cardamom, and dried red chilies. Let them cool and grind coarsely.
  • Mix the roasted spices with red chili powder, turmeric, and salt.

Bhuna the Karahi

  • Heat oil in a karahi or large pan. Add sliced onions and fry for a few minutes.
  • Stir in ginger garlic paste and green chili paste. Cook until fragrant.
  • Add the tomatoes, cover, and cook until soft. Remove the tomato skins if desired.
  • Add the cooked mutton and cook over high heat until most of the moisture evaporates.
  • Add the spice mixture and continue frying.
  • Add green chilies and cook until the oil separates from the masala.
  • Garnish with ginger julienne and serve hot with naan.

Notes

Natural pressure release helps keep the mutton tender and juicy.
Fresh tomatoes give the best flavor to the karahi.
Adjust the number of green chilies according to your preferred spice level.
Serve with naan, roti, or steamed rice.
Keyword Desi Mutton Recipe, Easy Mutton Karahi Recipe, Karahi Gosht, Pakistani Goat Curry

Crispy Masala Fish in Ninja Food

This Crispy Masala Fish is packed with bold spices and cooked until perfectly golden and crispy. The fish is marinated with aromatic seasonings and served with a fresh and flavorful mint chutney that adds a refreshing touch.

This easy recipe is perfect for lunch, dinner, or as an appetizer for gatherings. Made in the Ninja Foodi using the Air Crisp function, it gives you delicious crispy fish with less oil.

Why You’ll Love This Recipe

  • Crispy on the outside and tender inside
  • Full of delicious Indian flavors
  • Easy to make in the Ninja Foodi
  • Uses less oil than deep frying
  • Served with a fresh homemade mint chutney

Crispy Masala Fish in Ninja Food

This Crispy Masala Fish is packed with bold spices and cooked until perfectly golden and crispy. The fish is marinated with aromatic seasonings and served with a fresh and flavorful mint chutney that adds a refreshing touch. This easy recipe is perfect for lunch, dinner, or as an appetizer for gatherings. Made in the Ninja Foodi using the Air Crisp function, it gives you delicious crispy fish with less oil.
Prep Time 15 minutes
Cook Time 20 minutes
marrinate time 2 hours
Total Time 2 hours 45 minutes
Course Main Dish, Side Dish
Cuisine Indian, Pakistani, South Asian
Servings 6

Equipment

  • Ninja Foodi

Ingredients
  

For the Fish

  • 6 fish slices
  • 2 teaspoons cumin dry roasted and crushed
  • 1 tablespoon tandoori masala optional
  • ¼ teaspoon turmeric powder
  • ¼ teaspoon garam masala
  • 1 teaspoon red chili powder
  • 2 tablespoons ginger and garlic paste
  • 3 tbsp oil
  • teaspoons salt
  • 1 –2 tablespoons lemon juice

For the Mint Chutney

  • 1 cup fresh cilantro
  • ½ cup fresh mint leaves or basil leaves
  • ½ teaspoon cumin dry roasted and crushed
  • 3 teaspoons shredded coconut
  • ½ teaspoon salt
  • 2 –3 tablespoons lemon juice
  • ¼ cup water

For Cooking

  • About 2½ cups water
  • Non-stick cooking spray
  • Butter spray

Instructions
 

Marinate the Fish

  • In a bowl, combine cumin, tandoori masala, turmeric powder, garam masala, red chili powder, ginger and garlic paste, oil, salt, and lemon juice.
  • Coat the fish slices with the marinade and refrigerate for at least 2 hours.

Prepare the Mint Chutney

  • To make the mint chutney, blend cilantro, mint leaves or basil, cumin, shredded coconut, salt, lemon juice, and water until smooth.

Prepare the Ninja Foodi for Air Crisping

  • Place the grilling rack inside the inner pot of the Ninja Foodi and pour in about 2½ cups of water.
  • Lightly spray the rack with non-stick spray.
  • Arrange the marinated fish slices on the rack and spray them lightly with butter.

Air Crisp the Fish

  • Select Air Crisp and cook at 200°C (400°F) for 20 minutes, flipping the fish halfway through after 10 minutes.
  • Remove the fish from the Ninja Foodi and serve hot with the mint chutney.

Notes

Marinating the fish for at least 2 hours gives the best flavor.
Tandoori masala is optional but adds extra color and taste.
You can use mint leaves or basil leaves for the chutney.
Serve with lemon wedges and sliced onions for extra freshness.
Keyword Air Fryer Masala Fish, Crispy Masala Fish, Ninja Foodi Crispy Masala Fish

Instant Pot Balsamic Chicken

If you want an easy dinner that is full of flavor, this Instant Pot Balsamic Chicken is a great recipe to try. The chicken turns out juicy and tender, while the potatoes and carrots cook perfectly in the same pot. The rich balsamic sauce gives this meal a delicious sweet and tangy taste.

This recipe is simple enough for busy weeknights and special enough for family dinners. Since everything cooks together in the Instant Pot, there is less mess and less time spent in the kitchen.

Why You Will Love This Recipe

  • Easy one-pot meal
  • Tender and juicy chicken every time
  • Full of rich balsamic flavor
  • Potatoes and carrots cook with the chicken
  • Perfect for busy weeknights
  • Simple ingredients and easy steps

Easy Instant Pot Balsamic Chicken Dinner

Instant Pot Balsamic Chicken is a comforting one-pot meal featuring juicy chicken thighs, tender baby potatoes, and sweet carrots simmered in a rich balsamic sauce. The combination of savory seasonings and the sweet-tangy flavor of balsamic vinegar creates a delicious dinner with minimal effort. With everything cooked together in the Instant Pot, this hearty meal is perfect for busy weeknights when you want something satisfying without spending hours in the kitchen.
Prep Time 5 minutes
Cook Time 22 minutes
pressure cook 6 minutes
Total Time 33 minutes
Course Dinner, main course
Cuisine American, Italian-Inspired
Servings 4

Equipment

  • Instant Pot

Ingredients
  

Chicken

  • 8 chicken thighs 2 pounds/900 g
  • 1 teaspoon salt
  • 1 teaspoon paprika
  • 1 teaspoon garlic powder
  • 1 teaspoon Italian seasoning
  • ½ teaspoon black pepper
  • 1 tablespoon olive oil

Sauce

  • 2 tablespoons ghee
  • ¼ cup balsamic vinegar
  • 1 garlic clove chopped
  • ½ cup chicken broth

Vegetables

  • 1 pound baby potatoes quartered
  • 1 pound carrots cut into pieces
  • 1 tablespoon olive oil
  • 1 teaspoon Italian seasoning
  • 1 teaspoon garlic powder
  • 1 teaspoon salt
  • ½ teaspoon black pepper

Garnish

  • Fresh parsley

Instructions
 

  • Season the chicken thighs with salt, paprika, garlic powder, Italian seasoning, and black pepper.
  • Turn on sauté mode and heat olive oil. Cook the chicken for 5 to 6 minutes per side. Remove and set aside.
  • Add ghee, balsamic vinegar, and chopped garlic. Cook for 1 minute.
  • Pour in chicken broth and deglaze the pot. Simmer for 1 minute.
  • Mix potatoes and carrots with olive oil, Italian seasoning, garlic powder, salt, and black pepper.
  • Add the vegetables to the Instant Pot and place the chicken on top.
  • Close the lid and pressure cook on High Pressure for 6 minutes.
  • Perform a quick release.
  • Garnish with fresh parsley and serve.

Notes

  1. Deglaze the pot well to avoid the burn notice.
  2. Chicken thighs provide the best flavor and tenderness.
  3. Store leftovers in the refrigerator for up to 4 days.
Keyword Instant Pot Balsamic Chicken, Instant Pot Chicken Thighs, One-Pot Chicken Dinner

Shami Kabab | Easy Pakistani Beef Kabab Recipe

Shami kabab is known for its remarkably soft texture, rich aroma, and delicate balance of meat, lentils, and spices blended into a mixture that becomes crisp outside while staying tender inside. Unlike firmer grilled kebabs, shami kabab is prized for the way it almost melts with each bite while still carrying deep savory flavor.

Traditionally prepared by cooking meat together with chana dal, whole spices, onions, garlic, and ginger, the mixture is then ground until smooth before being shaped into patties and shallow fried until golden. This process creates the signature texture that makes shami kabab instantly recognizable across South Asian kitchens.

The lentils do more than simply stretch the meat mixture — they help create softness, structure, and balance while absorbing the flavor of the spices during cooking. Ingredients such as black pepper, cloves, cinnamon, cardamom, long pepper and green chilies build layers of warmth and aroma without making the kababs feel overly heavy.

Shami kabab is also valued for its versatility. It can be served with chutney, wrapped in paratha, placed inside sandwiches, enjoyed with tea, or prepared ahead for gatherings and freezer meals. Because the mixture holds shape well after cooking, shami kabab became especially popular for practical home cooking and festive preparations alike.

Crisp edges, soft centers, fragrant spices, and rich savory flavor continue to make shami kabab one of the most loved traditional kebab styles across South Asian cuisine.

Beef Shami Kabab

Tender, flavorful, and packed with aromatic spices, these Shami Kababs are a classic Pakistani favorite made with beef and lentils. Crispy on the outside and soft inside, they make a perfect tea-time snack, appetizer, or freezer-friendly meal prep option for busy days.
Prep Time 20 minutes
Pressure cook 1 hour 40 minutes
Total Time 2 hours
Course Main Dish, Snacks
Cuisine Indian, Mughlai, Pakistani
Servings 6

Equipment

  • Ninja Foodi This recipe can also be made in an Instant Pot, electric pressure cooker, stovetop pressure cooker, or on the stovetop.
  • Meat Chopper
  • Mixing bowl
  • Frying Pan

Ingredients
  

  • ¼ cup Oil
  • 1000 g Beef boneless cubes 1000g / 2.2 lbs
  • cup Ginger cut into small pieces
  • cup Garlic cut into pieces
  • cup Onions cut into small chunks
  • 2 tsp Salt
  • 3 tsp Red chili powder
  • ¼ cup Split Bengal gram (Chana dal) (helps create texture and structure)
  • 9 Dried button red chilies Whole spice
  • 5 Black cardamom Whole spice
  • 5 Green cardamom Whole spice
  • 7 Cloves Whole spice
  • 5 Long pepper Whole spice
  • ½ tsp Black pepper whole spice
  • 2 inch Cinnamon stick Whole spice
  • 5 Cubeb pepper (Tailed Pepper or Kabab chini) Whole spice
  • 2 tsp Red chili flakes
  • 2 tbsp Lemon juice
  • 2 Whole eggs (help bind the Kabab together)
  • ½ cup Yogurt Strained

Instructions
 

  • Cooking the Meat
  • Add oil to the inner pot of Ninja Foodi.
  • Add meat.
  • Add ginger, garlic and onions.
  • Add salt and red chili powder.
  • Add Split Bengal gram.
  • Add whole spices.
  • Mix well and level meat for even cooking.
  • No need to add water. Even after straining, the washed meat releases enough moisture for pressure cooking in Ninja Foodi or Instant Pot.
  • Pressure Cooking
  • Cover with pressure lid and pressure cook on High until the meat is tender, about 1 hour 40 minutes and release the pressure naturally.
  • Reducing the Moisture
  • After pressure cooking, open the lid and mix well.
  • Cover with glass lid and cook on saute mode over Medium-High.
  • Stir occasionally, cook until moisture dries out.
  • Turn off the heat and let it cool.
  • Grinding the Meat
  • Remove the whole spices, then grind the meat in small batches and transfer to a mixing bowl.
  • Preparing the Kabab Mixture
  • Add chili flakes to the ground mixture.
  • Add lemon juice.
  • Add eggs.
  • Add yogurt.
  • Mix well.
  • Shaping the Kababs
  • Lightly grease your hands with oil before shaping the kababs to prevent the mixture from sticking.
  • Shape the mixture into kababs.
  • Shallow Frying the Kababs
  • Heat a little oil in frying pan.
  • Shallow fry the kabab on medium heat until beautifully golden brown and crispy.
  • These kababs are crispy on the outside and juicy on the inside.
  • Storage
  • Store unfried Shami Kababs in an airtight container in the refrigerator for up to 4-5 day
  • Freezing
  • Freeze the shaped unfried kababs in a freezer safe container for up to 6 months. Separate layers with parchment paper to prevent sticking.
  • Serving Suggestion:
    Pair with parathas, chapati, rice, sandwiches, burgers, or wraps for a versatile meal or snack.
    Don't have Whole Spices? No Problem!
    Even if you do not have the full list of whole spices, the recipe will still turns out delicious. The combination of meat, Chana Dal, onion, ginger, garlic, salt, chili powder, yogurt and eggs still creates flavorful and satisfying Shami Kababs. Use whichever whole spices are available for extra depth and aroma.
Keyword Beef Kabab, Beef Recipe, Desi Recipes, Eid Recipes, Freezer Friendly, High Protein, Indian Food, Kabab Recipe, Make Ahead, Meal Prep, Mughlai Cuisine, Pakistani Food, Ramadan Recipes, Shami Kabab, Snack Recipe, Tea Time Snack

Date and Nut Bars | Healthy Homemade Energy Bars

These date and nut bars bring together buttery biscuit crumbs, soft dates, crunchy nuts, coconut, and condensed milk into a rich baked treat filled with texture and sweetness. Every slice carries layers of chewiness, crunch, and caramel-like flavor, making the bars feel indulgent while still built around familiar pantry ingredients.

The crushed biscuits create structure and buttery richness, while the dates and condensed milk hold everything together into a dense and satisfying bite. Toasted nuts add crunch throughout the bars, and the coconut gives a light sweetness and texture that balances the richness beautifully.

Cut into triangles or slices, these bars work perfectly for tea time, dessert platters, gatherings, gifting, or quick homemade treats kept ready in the fridge. Their combination of crunch, chewiness, and buttery sweetness is what makes them so difficult to stop reaching for once sliced.

Chewy Date and Nut Dessert Bars

Soft, chewy, and naturally rich in flavor, these Date and Nut Bars combine crunchy nuts with sweet dates for an easy homemade treat. Perfect as an energy snack, tea-time bite, or healthier dessert option, these bars are simple to make and wonderfully satisfying.
Prep Time 10 minutes
Baking Time 1 hour
Total Time 1 hour 10 minutes
Course Dessert
Cuisine Middle Eastern-Western Fusion
Servings 6

Equipment

  • Chopping Board
  • Knife
  • Mixing bowl
  • Spatula
  • Tart pan 23.5 x 2.96 cm (9.25 x 1.15 inches)
  • Oven

Ingredients
  

  • 1 cup Digestive biscuits Crushed
  • 1/4 cup Butter Softened
  • 1 cup Coconut Shredded
  • 1/2 cup Almond Dry roasted and Chopped
  • 1/2 cup Walnuts Dry roasted and Chopped
  • 1/2 cup Pecans Dry roasted and Chopped
  • 1/2 cup Hazel Nuts Dry roasted and Chopped
  • 1/2 cup Dates Chopped
  • 1 1/4 cup Condensed Milk Sweetened
  • 1 tsp Sunflower Seeds Dry roast
  • 1 tsp Melon Seeds Dry roast
  • 1 tsp Pumpkin Seeds Dry roast

Instructions
 

  • Preparing the Ingredients
  • Bring the butter at room temperature
  • Dry roast the nuts and seeds
  • Chop the dates and nuts
  • Crush the biscuit
  • Mixing the Ingredients
  • Mix butter and crushed biscuits in a bowl
  • Mix in all the nuts and dates
  • Pour in condensed milk and mix well
  • Preparation for Baking
  • Pour the mixture in a tart pan lined with parchment paper
  • Sprinkle the roasted nuts on the top
  • Baking
  • Transfer the tart pan in the oven.
  • Bake at 250 F for 60- 65 minutes or until you get your desired firmness and color.
  • Cooling & Cutting
  • Once cool cut into triangles.
  • Cool completely before cutting and use a sharp buttered knif
Keyword Chewy Dessert Bars, Date and Nut Bars, Date Bars, Dessert Bars, Easy Dessert Recipe, Eid Dessert, Energy Bars, Fusion Dessert, Healthy Dessert, Homemade Dessert, Homemade Snack, Make Ahead Dessert, Meaningful Masala, Middle Eastern Dessert, No Yeast Dessert, Nut Bars, Nuts and Dates, Snack Bars, Sweet Treats, Tea Time Snack

Chicken Karahi With Bold Ginger Garlic Flavor

Chicken karahi built around ginger, garlic, red chili, and warming spices creates a flavor that feels bold, direct, and deeply satisfying without relying on rich gravies or heavy sauces. The spices coat the chicken closely as it cooks, creating a thick masala filled with aroma, heat, and concentrated flavor.

Fresh ginger and garlic form the foundation of the dish, while red chili and garam masala add warmth and depth that continue building as the karahi cooks over high heat. The result is a style of chicken karahi that feels rustic, spice-forward, and intensely savory while still allowing the flavor of the chicken itself to remain clear.

Without tomatoes and cream, the dish develops a more concentrated and traditional karahi-style flavor where sizzling aromatics and roasted spices become the focus. Every bite carries warmth, smokiness, and the unmistakable flavor of freshly cooked masala clinging directly to the chicken.

Served hot with naan, roti, or rice, this style of chicken karahi delivers the kind of bold homemade flavor that feels hearty, fiery, and deeply comforting at the same time.

Chicken Karahi with Bold Ginger Garlic Flavor

Tender chicken simmered in a rich, flavorful masala with tomatoes, ginger, garlic, and aromatic spices makes this Chicken Karahi a comforting Pakistani classic. This easy one-pot curry delivers bold Desi flavors and pairs perfectly with naan, roti, or steamed rice for a satisfying family meal.
Prep Time 3 minutes
Cook Time 30 minutes
Total Time 33 minutes
Course Main Dish
Cuisine Indian, Pakistani

Equipment

  • 1 Ninja Foodi

Ingredients
  

  • ½ cup Oil
  • ½ cup Ginger and garlic in equal amount
  • 900 g Chicken Boneless cubes 900g / 2 lbs
  • 2 tsp Salt
  • 5 tsp Red chili powder Use Kashmiri chili powder for a less spicy version or adjust the chili powder according to your preference
  • ½ tsp Turmeric powder
  • ½ cup Yogurt Whipped
  • ¼ tsp Black pepper Freshly crushed
  • ¼ tsp Garam masala
  • ½ cup Cilantro Chopped
  • 5 Green chilies Add whole green chilies for aroma rather than heat

Instructions
 

  • Turn on saute mode at medium
  • Add oil into the pot
  • Add ginger and garlic
  • Fry until release aroma and color slightly changes
  • Add chicken
  • Mix well
  • Add salt, red chili powder, and turmeric
  • Mix well
  • Cook at medium until chicken gets tender and moisture dries out
  • Add yogurt
  • Mix well
  • Cook until moisture from the yogurt dries out
  • Stir occasionally to prevent sticking to the bottom
  • Once the moisture dries out, fry well until oil separates from the masala
  • Add black pepper and garam masala
  • Mix well
  • Cook for a few more moments to help the oil separate
  • Add chopped cilantro and whole green chilies
  • Cook for a few more moments to allow the green chilies to release their aroma
  • Garnish with fresh cilantro and ginger julienne
  • Serve with roti, parathas, naan, rice or even pasta. It also works beautifully in sandwiches, and wraps.
Keyword Black Pepper Chicken, Chicken Curry, Chicken Karahi, Ginger Garlic Chicken, Indian Food, Karahi Chicken, Pakistani Chicken Karahi, Pakistani Food

Creamy Beef & Mushroom Pasta

Rich beef, earthy mushrooms, and creamy sauce come together in this one-pot pasta to create a meal that feels deeply comforting from the very first bite. As the pasta cooks under pressure, it absorbs the flavor of the beef, garlic, mushrooms, and seasonings directly into the sauce, creating a dish that tastes far richer than its short cooking time suggests.

The mushrooms add depth and savoriness while the creamy sauce coats every piece of pasta with a smooth and velvety texture. Black pepper, garlic, herbs, and parmesan help balance the richness, giving the dish warmth and aroma without overpowering the beef itself.

Prepared in the Ninja Foodi pressure cooker, this pasta comes together in just minutes while still developing the kind of flavor usually associated with slower comfort meals. Everything cooks in one pot, making the dish practical for busy evenings while still feeling hearty, filling, and homemade.

Finished with extra parmesan, herbs, or cracked black pepper, creamy beef and mushroom pasta delivers richness, warmth, and satisfying texture in a way that feels perfect for cozy everyday meals.

One Pot Creamy Beef Mushroom Pasta in Ninja Foodi

Creamy, rich, and comforting, this Beef and Mushroom Pasta combines tender beef, earthy mushrooms, and pasta in a flavorful creamy sauce. Made in the Ninja Foodi pressure cooker for a quick and easy one-pot meal, this hearty pasta recipe is perfect for busy weeknights and cozy family dinners.
Prep Time 17 minutes
Pressure cook 3 minutes
Total Time 20 minutes
Course Main Dish
Cuisine Fusion of Italian and Desi
Servings 2

Equipment

  • Ninja Foodi

Ingredients
  

  • 3 tbsp Olive oil
  • 1 tbsp Onion sliced
  • 2 tbsp Ginger and garlic Paste 1:1 ratio
  • 1 tbsp Green chilies thinly sliced
  • 3 piece Mushrooms 80g
  • 200 g Beef slice
  • 475 ml water
  • 240 g Pasta Penne
  • tsp Salt
  • ½ tsp Black pepper Freshly cracked
  • ½ cup Parmesan Freshly shredded
  • cup Cream Cooking

Instructions
 

  • Turn On Ninja Foodi
  • Turn on saute mode at Medium-Low.
  • Adding Ingredients
  • Add oil to the inner pot of the Ninja.
  • Add onion slices, ginger garlic paste and, lightly fry until release aroma.
  • Add green chili slices and mushrooms.
  • Frying the Ingredients
  • Fry the green chilies and mushrooms for few moments.
  • Remove and Set aside
  • Remove the onions, green chilies, and mushrooms from the pot and set aside.
  • Searing the Beef
  • Add the beef slice and cook on both sides.
  • Remove from the pot and set aside
  • Adding water & Pasta
  • Add water and pasta into the pot
  • Levelling the Pasta
  • Level the pasta so it is fully submerged for even cooking.
  • Adding Ingredient
  • Add salt
  • Pressure Cooking
  • Pressure cook at High for 3 minutes and release the pressure Naturally.
  • After pressure cooking ends, open the lid and mix well.
  • Reducing the Moisture
  • Switch to saute mode at High and cook until moisture dries out.
  • Adding Ingredients
  • Add black pepper, parmesan and, mix well
  • Add cooking cream and, mix well.
  • Add mushrooms and, beef, cut into thin strips and, mix well.
  • Serving Suggestion:
    Garnish with fresh cilantro and, serve hot.
Keyword Beef Mushroom Pasta, Beef Pasta Recipe, Comfort Food, Creamy Beef Pasta, Creamy Pasta, Easy Pasta Recipe, Fusion Pasta, Homemade Pasta, Instant Pot Pasta, Italian Desi Fusion, Meaningful Masala, Mushroom Pasta, Ninja Foodi Pasta, Ninja Foodi Recipe, One Pot Dinner, One Pot Pasta, Pasta Dinner, Pressure Cooker Pasta, Weeknight Dinner

Khageena – Spiced Desi Masala Scrambled Eggs

The sound of eggs sizzling with onions, green chilies, and spices is enough to make khageena feel instantly comforting. Soft scrambled eggs absorb the flavor of garlic, herbs, and warming spices beautifully, creating a dish that feels simple yet deeply satisfying.

Unlike plain scrambled eggs, khageena carries layers of texture and aroma from caramelized onions, fresh chilies, and spices cooked directly into the eggs. Every bite feels savory, rich, and full of warmth while still remaining quick and practical enough for everyday cooking.

Often served with paratha, roti, toast, or warm bread, khageena has remained a familiar part of many South Asian breakfasts because it transforms a few basic ingredients into something flavorful, filling, and comforting within minutes. Hot, soft, and packed with spice, it is the kind of meal that feels both homestyle and deeply satisfying from the very first bite.

Khageena | Spicy Pakistani Scrambled Eggs

Spiced Egg Khageena is a traditional South Asian egg dish made with caramelized onions, aromatic spices, and eggs cooked until soft and flavorful. It is a quick and satisfying meal, perfect for breakfast, brunch, or a light dinner. Serve hot with parathas, naan, or crusty bread.
Prep Time 5 minutes
Stir Frying Time 10 minutes
Total Time 15 minutes
Course Breakfast
Cuisine Indian, Pakistani
Servings 3

Ingredients
  

  • 7 tablespoons ghee ½ cup less 1 tablespoon
  • 1 teaspoon ginger-garlic paste
  • 2 cups onions thinly sliced
  • teaspoons salt or to taste
  • 1 teaspoon red chili powder
  • ¾ teaspoon turmeric powder
  • ¼ cup fresh coriander leaves chopped, plus extra for garnish
  • ¼ teaspoon black pepper
  • 6 eggs

Instructions
 

  • Heat the ghee in a large frying pan over medium heat.
  • Add the ginger-garlic paste and sauté until fragrant.
  • Add the sliced onions and stir.
  • Stir in the salt, red chili powder, and turmeric powder. Fry for a few moments.
  • Cover the pan and simmer for 2–3 minutes.
  • Uncover and mix well.
  • Add the chopped coriander leaves and black pepper. Stir to combine.
  • Push the onion mixture to the sides of the pan, creating space in the center.
  • Crack the eggs into the center of the pan.
  • Cover and cook for a few minutes until the egg whites begin to set.
  • Break the egg yolks and gently mix them into the whites.
  • Cover again and cook until the eggs are slightly firm.
  • Carefully turn the eggs to cook evenly on both sides.
  • Taste and adjust salt if needed.
  • Stir the eggs and onion mixture together until well combined.
  • Sprinkle with additional fresh coriander leaves.
  • Cover and simmer for another 1–2 minutes.
  • Serve hot with parathas.

Notes

For a richer flavor, use homemade ghee.
Adjust the chili powder according to your preferred spice level.
Do not overcook the eggs; they should remain soft and moist.

Serving Suggestion

Serve hot with freshly made parathas, naan, roti, or toasted bread for a hearty and comforting meal.
Keyword comfort food breakfast, desi egg recipe, easy egg breakfast, flavorful egg recipe, homemade breakfast recipe, khageena, khagina, masala eggs, Meaningful Masala recipes, one pan egg recipe, onion tomato eggs, pakistani breakfast, pakistani scrambled eggs, protein rich breakfast, quick breakfast recipe, south asian breakfast, spicy egg dish, spicy scrambled eggs, traditional desi breakfast

Spicy Roasted Nuts

Warm spices clinging to crisp roasted nuts create the kind of snack that is difficult to stop reaching for. Every bite brings crunch, gentle heat, and deep roasted flavor, making these spicy nuts perfect for tea time, gatherings, travel, or simple everyday snacking.

The roasting process gives the nuts a richer aroma and deeper texture, while the spices add layers of warmth without overpowering their natural flavor. The balance between savory spices, toasted nuttiness, and crisp texture is what makes homemade roasted nuts feel far more satisfying than ordinary packaged snacks.

Served in small bowls alongside tea or shared during conversations and family gatherings, spiced nuts have long been part of relaxed snacking traditions in many regions. Simple, flavorful, and deeply crunchy, they turn everyday ingredients into something irresistibly enjoyable.

How to make Spicy Nut Mix at Home! (Better Than Store Bought)

A crunchy and flavorful mix of roasted almonds, walnuts, cashews, and makhana tossed in aromatic spices, ghee, and a touch of sweetness. Finished with raisins and cranberries, this snack is perfect for tea time, parties, or festive gatherings.
Roasting Time 10 minutes
Total Time 10 minutes
Course Appetizer, Snacks
Cuisine Indian, pakistani fusion
Servings 9

Equipment

  • Large frying pan or wok
  • Wooden spoon
  • Airtight storage container

Ingredients
  

  • 1 cup walnuts
  • 2 cups almonds
  • 1 cup cashews
  • 2 cups lotus seeds makhana
  • 2 –3 tbsp ghee
  • tsp red chili powder
  • tsp turmeric powder
  • tsp chaat masala optional
  • ½ tsp black salt kala namak, optional
  • 2 tsp salt adjust to taste
  • 2 –3 tbsp sugar add gradually
  • cups black raisins
  • cups dried cranberries

Instructions
 

  • Heat a large pan on low to medium flame.
  • Add almonds and walnuts and roast until fragrant and lightly golden. Remove and set aside.
  • In the same pan, add cashews and lotus seeds (makhana).
  • Roast until light golden and aromatic.
  • Add ghee and push cashews and makhana to one side of the pan.
  • Add red chili powder, turmeric powder, chaat masala, black salt, and regular salt.
  • Lightly fry the spices in ghee for a few seconds to release aroma.
  • Toss everything well so the nuts and makhana are evenly coated with spices.
  • Add roasted almonds and walnuts back into the pan and mix well.
  • Gradually add sugar and mix until slightly caramelized and balanced.
  • Add black raisins and dried cranberries.
  • Toss everything together until evenly combined.
  • Let it cool completely before storing or serving.

Notes

Always roast on low heat to avoid burning the nuts.
Add sugar gradually depending on your preferred sweetness.
You can store this mix in an airtight container for up to 2–3 weeks.
Customize with pistachios or peanuts if desired.
Keyword Healthy Nuts Mix, Spiced Roasted Nuts, Sweet and Spicy Nuts, Trail Mix Recipe, Makhana Snack

Creamy Hummus with Garlic Chili Oil

Hummus is one of those timeless dishes that beautifully combines simplicity, nourishment, and bold flavor using only a few wholesome ingredients. Made with chickpeas, tahini, garlic, lemon, and olive oil, hummus continues to remain a staple across many Middle Eastern tables because of its smooth texture, rich flavor, and incredible versatility.

This version is blended until extra creamy and finished with warm garlic chili oil for added depth, aroma, and richness. The balance between the nutty tahini, fresh lemon, savory garlic, and silky olive oil creates a dip that feels both comforting and deeply satisfying.

Whether served as part of a mezze spread, enjoyed with warm bread, paired with grilled dishes, or used as a nourishing snack, hummus continues to remain one of the most appreciated examples of how simple ingredients can create something both elegant and flavorful.

Creamy Hummus with Garlic Chili Oil – Middle Eastern Desi-fusion

A smooth and creamy homemade hummus made with chickpeas, tahini, olive oil, and salt, then topped with fragrant garlic chili oil for an extra layer of flavor. Perfect as a dip, spread, or part of a mezze platter.
Prep Time 5 minutes
Cook Time 5 minutes
Total Time 10 minutes
Course Appetizer
Cuisine Middle Eastern-Desi Fusion
Servings 5

Equipment

  • Food Processor or Blender

Ingredients
  

Hummus (Base Ingredients)

  • 2 cups 400 g boiled chickpeas
  • 130 g tahini
  • 1/4 cup olive oil
  • 1/3 cup water adjust as needed
  • 1 tsp salt

Tarka (Garlic Chili Oil)

  • 2-3 tbsp olive oil
  • 3-4 garlic cloves thinly sliced
  • 1 tsp chili flakes

Instructions
 

Hummus (Base Preparation)

  • Add boiled chickpeas, tahini, olive oil, water, and salt to a food processor.
  • Blend until smooth and creamy. Add more water if needed to reach your desired consistency.
  • Transfer the hummus to a serving bowl.

Tarka (Garlic Chili Oil)

  • Heat olive oil in a small pan.
  • Add the sliced garlic and fry until golden and fragrant.
  • Remove the pan from the heat.
  • Add the chili flakes and stir immediately.
  • Pour the garlic chili oil over the hummus.
  • Serve immediately.

Notes

Adjust the amount of water to achieve your preferred consistency.
Adding the chili flakes after removing the oil from the heat helps prevent them from burning.
Serve with pita bread, fresh vegetables, crackers, or as part of a mezze platter.
Keyword chickpea dip, creamy hummus, homemade hummus, hummus recipe
Privacy Overview

This website uses cookies to provide you with the best possible user experience. Cookie information is stored by your browser and performs functions such as recognizing you when you return to our website, as well as helping our team understand which parts of the website are most interesting and useful to you.